Preview

This is your website preview.

Currently it only shows your basic business info. Start adding relevant business details such as description, images and products or services to gain your customers attention by using Boost 360 android app / iOS App / web portal.

SALBROENGINEERS 5954e9473576cd05187e322f Products https://www.salbroengineers.com
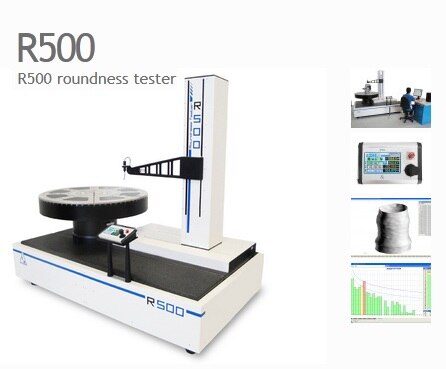
R500 roundness tester is located at the top of machines for the characterization of revolution surfaces in the world panorama for what concerns the maximum dimensions of the object that can be measured; born from the thirty year experience that SM has in this field, it has been designed to measure bulky and heavy pieces, maintaining high accuracies.R500 features 3 metrological axes, pneumostatically supported, for measurement and positioning, which ensure fluent movements without frictions and remarkable sturdiness of the entire system.The flagship application of R500 is the characterization of bulky particulars in the energy sector (turbines, compressors, bearings) where all the essential characteristics for the final quality of the product must be determined.The motorized plate allows the automatic centering of the piece, executed with a procedure inside the Circom software.CHARACTERISTICS:Pneumostatic platePlatform diameter: 650 mmExpansion diameter:  1200 mmMaximum measureable diameter:   1300 mmAxial bearing capacity:    1500 kgRadial run-out (at plate level):  ≤0,1 μmSpeed: 0,25 – 3 rpm (measurement) 0 – 6 rpm (positioning)Friction: Pneumostatic due to manual rotationCentring range: ±5 mm with automatic cycleLevelling range: ± 1°Resolution: 0,009° (40k pts/rev)Pneumostatic R axisUseful traverse length: 650 mmLinearity:  ≤ 0,5 μm su 500 mmSpeed:   0,2 – 10 mm/sResolution: 1 μmC axis (Column with recirculating ball guides)Useful traverse length: 900 mmMaximum height  : 600 mm (from plate surface)Linearity error:   ≤ 0,5 μm on 500 mmSpeed  : 0,5 – 15 mm/sResolution 0,1 μmPick-up Measurement positioning: In three positions (internal, external, lateral)Measurement strength  :  Internal/external 20 – 150 mNMeasurement range :   ±1000 μmSupplied pick-ups  :   N° 3 two-directional with 8 mm ruby sphere
R500 Roundness Tester

INR 1

VIEW DETAILS

Filter using tags

Measure ComponentsMeasure Balls for RoughnessMeasure Components for RoughnessMeasurement ServiceRaRzRoughness ParameteresRoughness MeasurementWaviness AnalysisWaviness MeasurementRoller Camber MeasurementRoller Camber Analysis programRoller Camber AssesmentelectionVoting MachineDigital VotingCandidateselectronic votingElectronic Voting MachineEVMVoteElection voting MachineCo-Op Bank ElectionRoughnesssSurface RoughnessPalmtop RoughnessSurface MetrologyRoughness Testersurface analysisPortable Roughness TesterWARPsurfroughness parametersRoughnessWavinessDominant wavinessMaterial ratio curve (bearing)height amplitude distributionroughness averageroundnessConcentricityParallelismCylindricityDiameterPerpendicularityThickness variationNew Roundness and Cylindricityroundness testerRoundness Measuringroundness measurementCylindricity measurementStraightnessbearing ratio curveraunfiltered profileGaussian Filter2CR filterDigital filtersMachine controlPre-owned MachinesRetrofit PakageSurface Roughness & Waviness Retrofitsurface roughness retrofitAnalysis softwareAnalysisRoughness AverageRetrofitBearingRadial PlayRadialEmbeddedADCPlunger ProbeBearing Radial ClearanceData Logger SystemEmbedded systemEmbedded codingLan Remote ConnectRollersRingsBearingsCamberMeasurement ServicesCalibrationContour MeasurementContour Machine CalibrationCalibrateCAD programCAD functionsRoundness Teste Retrofit PackageLaboratary Roundness TesterUpgraded SoftwareFlatnessRelative EccentricityeccentricitysquarenessVelocity AnalysisHarmonicsAxial RunoutRadial RunoutRtBallsPortableContourTalysurf5120mm TraverseRetrofitted machinesSeSurf Retrofit PackageOn SaleSurface FinishRoughness Meanlarge Size Bearings measurementForm Measurementturbines measurementcompressors measurementRoundnessCylindricity with RoundnesscoaxialityspherocitySKF Waviness Analysistotal run outrun-outPortable RoughnessTalysurf4Transperant, Reliable, RobustLinear GraphFFT algorithumLSCMICMCCMZCSpecimen hemisphereGuizzo specimenSpecimen cylindercalibrate sensitivityGlass HemisphereMaster CylinderSoccerTrainerGoal Keeper TrainerFootball Trainer machinefootballTrainlinearitycylindricityconicityconcentricityparallelismthickness variationLabortary Roundness TestercontourProfile Studio softwareElectionVVPATEVM RentalsEVM for HireEVM on RentSoccer Trainerunmanned systemfootball practiSurface Parallelismharmonicsdata accusitionBest Fit CurveBest Fit LineSlope RemovalProfilometersAutomatic CNC positioningAutomatic CNC measuringPortable Surface Roughness TesterTransparent ResultsElectronic Votingvotemultiple votingnon tamperableEVM manufacturerElection voting SystemVoting SystemsFlatnesssParkingParking SolutionsParking managementUnmanned Parkingparking lotParking assistanceVotingVoting CenterVoting BoothMultiple VotingTalyrond 252SeRoundISO standardsISO 13565-1Radial ClearanceBrearing PlayDataloggerLog DataMultiple Category Votinglarge Size Bearingslarge size bearingsCylindricity With RoundnessMulti Profile PlotWave Amplitude ControlcamberHeight

Have any question or need any business consultation?

Have any question or need any business consultation?

Contact Us